About Classroom Crafts...
If you have a craft project that would be of particular interest to fellow teachers, please consider sending it to editor@teachers.net.
$10.47 from Amazon.com
First Art : Art Experiences for Toddlers and Twos
by MaryAnn F. Kohl, Renee F. Ramsey, Dana Bowman, Katheryn Davis
More information

 Classroom Crafts
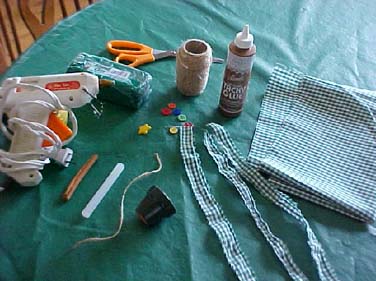
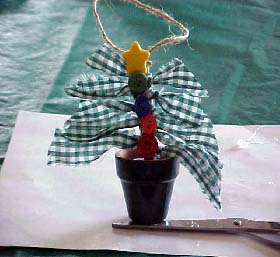
by The Teachers.Net Community Cinnamon Stick Christmas Trees by Cheryl Ristow (aggie/1/ca)
Supplies:
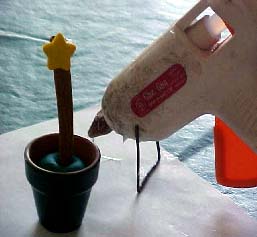
Pinch off a small piece of floral clay. Roll it into a ball.
Place clay in pot. Insert cinnamon stick. Using a glue gun, glue star to the top of the cinnamon stick.
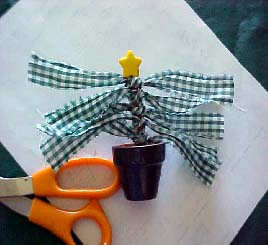
Using a simple over-and-under knot, tie strips of fabric onto cinnamon stick.
Trim fabric strips into a Christmas tree shape by cutting each strip a little shorter than the one before it.
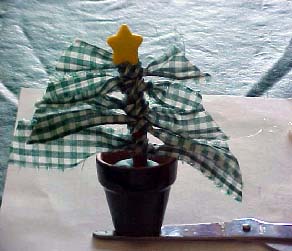
Glue the small colored buttons to the middle of the cinnamon stick. Glue some jute (or ribbon) to the back of the stick to make a hanger.
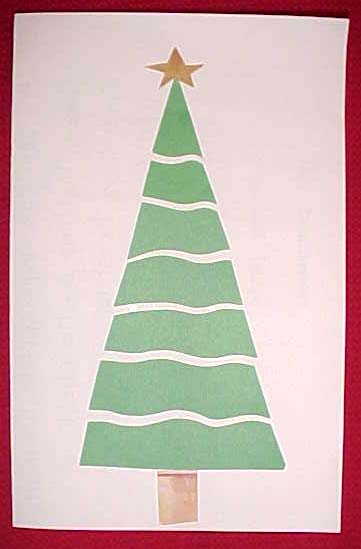
Simply Elegant Segmented Tree by Kathleen Carpenter A holiday card or nature theme note card For ages 5 through adult This card project is simple but produces a rather elegant looking effect, even when done by young children. You can use plain green construction paper or jazz it up with foil paper, colorful gift wrap, or any other interesting paper to make the tree shape. Use plain white or colored construction paper for the folded care or add interest by using special paper for the card. First, make a simple evergreen tree shape, just a tall triangle. The trunk will be added later using another color or texture. The size of your tree shape will depend upon the size of the front of the card. Next, cut the tree shape into horizontal segments and re-assemble the tree by gluing the segments onto the front of the card, but leave a little space between each segment. Keep the spaces fairly uniform in size. For example, cut the top of the tree off the tree shape. Glue that near the top of the card front. leaving space if you plan to add a star topper. Then cut off another slice off the new top, and glue that under the small triangle top. So, you are reassembling the tree but allowing some of the background color to show through. If you're gluing the tree onto white, it will appear that snow or white garland is encircling the tree. If you glue the tree onto gold or silver or another color foil or paper, it will appear that a glittering garland wraps the tree.
Use straight cuts, curvy cuts, or cut diagonally for various effects, depending upon the age, ability, and imagination of the students. A gold star sticker at the top is an option. You and your students can come up with other innovations. (Cut shapes from full color advertising flyers, for instance.) If the product is to be generic rather than a holiday card, use nature theme embellishments (cut out pine cone or bird shapes, etc.). Add the trunk of the tree using any medium (crayon, paper, real bark, etc.). In the basic tree card shown here, the 'trunk" was cut from a store flyer. . . from a picture of a wooden cutting board. The star was cut from a picture of golden draperies in the same flyer. Pencil Holder A gift a child can make for a loved one by Emmy Ellis on a Teachers.Net Mailring - http://www.teachers.net/mailrings Wash thoroughly an empty vegetable or fruit can. If sharp edges remain inside rim, cover with tape. For each can, cut a strip of white paper that is cut long & wide enough to cover the can
The verse:
This little can, made of tin,
The child's name is signed at the bottom of the verse before it is laminated. Papier Mache Picture Frame by shelly 2/AR on the Primary Elementary Chatboard - http://teachers.net/mentors/primary_elementary My son made a neat picture frame this summer at our local museum. It was paper mache'.
Basically, mulch up (food processer) old newspaper; The teacher in this class had cardboard under the waxpaper with a drawn guide for the correct shape. Before it dries, press in buttons, sequins, mardi gras beads, etc. It can be baked on low for a couple of hours to dry, or allow to dry over 2-3 days (depending on size. Ours was 8x10 and took 3 days). When it is dry, glue it onto cardboard cutout for stability. Reindeer Print T-Shirts
Posted on the Kindergarten mailring - Every year we have parents come in and help us make reindeer T-shirts for the kids to wear at our Holiday Concert. We paint one of their feet brown and have them stamp that onto the shirt. Then we paint both of their hands green to stamp for the antlers. A parent stamps the child's name under the reindeer with red paint and letter sponges. We then glue 2 wiggle eyes and a red pom pon on for the eyes and nose using washable fabric glue. The kids and parents love making these every year! Poppers
Posted by m.a. on the Third Grade Mailring - I like to make POPPERS for my students and give them at Christmas time. Take empty paper towel rolls and cut them about 6"long. (I don't put food in empty toilet paper rolls because of bathroom germs.) Fill with stickers, wrapped candy, etc. Wrap in pretty foil papers, or 2 layers of colored tissue paper. Fasten with a sticker and tie ends with ribbon. They look so festive. Usually I make these at home, but last year, I bought all the stuff and asked two volunteer moms to come in and they spread out all the stuff on the big library tables and made them all. They had a good time, and I invited them to make a few extra for their own purposes. They kept it a secret also. How beautiful they looked!
Check out the latest buzz in the Project Center...
|