chat center
SUBSCRIBE MY LINKS:

Latest Posts Full Chatboard Submit Post

Current Issue » Table of Contents | Back Issues


TEACHERS.NET GAZETTE
Volume 4 Number 2

COVER STORY
When it comes to using their own money to purchase classroom materials and supplies, teachers have pockets deeper than Captain Kangaroo's...
REGULAR FEATURES
Apple Seeds: Inspirational quotes by Barb Erickson
Special Days This Month by Ron Victoria
Classroom Photos by Members of the Teachers.Net Community
February Poem
Winter Memories
The Lighter Side of Teaching
  • Goose the Substitute Teacher by Goose
  • YENDOR'S Top Ten
  • Schoolies
  • Woodhead
  • Handy Teacher Recipes
    Classroom Crafts
    Help Wanted - Teaching Jobs
    Recipe for Friends from the Lesson Bank
    PRINTABLES
    Sentence Builder
    Meet the Feet!
    Reading Contract
    Autobiography
    Upcoming Ed Conferences
    Letters to the Editor
    TEACHER INSPIRATION
    Why Be a Teacher? by smagee/k/tx
    I am feeling soooo good about this... by Tina
    ON-SITE INSIGHTS
    Do you keep track of how you come to think the way you do? by Roger Fuller
    Why Can't We Clone Great Teachers? by Dave
    February Columns
    February Articles
    February Informational Items
    Gazette Home Delivery:

    About Classroom Crafts...

    If you have a craft project that would be of particular interest to fellow teachers, please consider sending it to editor@teachers.net.


    Suggested Books


    The Blizzard's Robe
    by Robert Sabuda

    $11.20 from Amazon.com
    More information


    First Art : Art Experiences for Toddlers and Twos
    by MaryAnn F. Kohl, Renee F. Ramsey, Dana Bowman, Katheryn Davis

    $10.47 from Amazon.com
    More information


    Classroom Crafts
    by The Teachers.Net Community

    Crayon Resist Activity

    by Debbie Oswald

    An extension of the the book,
    The Blizzard’s Robe
    by Robert Sabuda
    (adaptable to other books and projects)

    Materials for each student:

    • 1 sheet of 12" x 18" white paper
    • crayons
    • newspaper (enough to form a "pad" under each student’s paper)
    • a station of watercolor trays, brushes and water
    • optional: glue and glitter

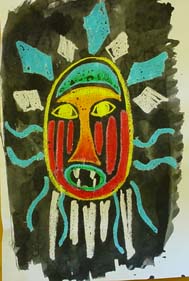
    I like to do with my younger students seasonal projects that have artistic merit, teaching them the elements of art. I developed this lesson when I saw the gorgeous batik pictures in Robert Sabuda's book, The Blizzard's Robe. The story is a legend about how the North Wind gave an Eskimo tribe the northern lights in exchange for his life, all thanks to the sewing skills of a little girl.

    The North Wind has a gorgeous mask-like face, and we use that as a jumping off point for our own winter mask project. I use a crayon resist technique for this.

    First, I have the children draw a mask shape on their 12 x 18" white paper, using crayon in a very thick heavy line. Then they draw in eyes, coloring them inside but leaving a space of white paper around the shape of the eyes. Next they draw and color the nose, mouth, eye brows, any stripes or other designs, always leaving uncolored a space around the shape or facial feature. They are encouraged to use light and bright crayon colors and to color inside the shapes "waxy, shiny" with no freckles of the white paper showing through. I help this process along by having them use a "pad" of newspaper under their drawing, which assists in the complete coverage of crayon.

    I demonstrate the project by making large dramatic features, using many colors, adding patterns of shapes in and around the facial parts. We leave some of the face uncolored, around each feature and embellishment, as this is where the resist part comes into play.

    The children add "hair" or icicles, or other patterns around the outside of the mask as well, filling up much of their 12 x 18 piece of paper. After the coloring is complete, we take the pictures to a painting station and use either black, purple or blue watercolor and paint over the entire mask, the crayon resists the paint and the paper absorbs it. I have to remind my first graders not to over paint- to keep stroking and stroking over the picture- so it won't lose its vibrant quality. I also have to remind them that the watercolor will dry lighter than it is wet, so they need to make it as dark as they can.

    When dry, I cut out the masks and mount them on a black or other color piece of construction paper as a "frame." For a special touch I have the children put some lines of glue on the black paper "frame" and I sprinkle on some gold or silver glitter.


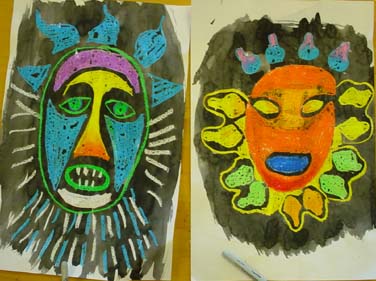
    Face-Paint Stencils

    by MaryAnn F. Kohl

    From Making Make-Believe, by MaryAnn Kohl, published by Gryphon House

    Face Painting is the easiest disguise, masquerade, mask, costume, or celebration attire you can make. Here's a new twist on an old favorite: stenciling designs on the face with washable paints

    Materials

    Tempera paints
    make-up sponges, slightly damp
    face lotion
    paper
    selection of brushes, like small paint brush
    cotton swab
    make-up brush
    eye-liner brush
    scissors
    pie pan or other plate
    mirror, optional
    tape
    pencil
    Note: Consider using Biocolor© non-toxic paint from Discount School Supply because it peels off when dry and is otherwise entirely washable.

    Process

    1. Place puddles of tempera paints on the pie pan, about 2 T. for each color.
    2. Squirt or drop a teaspoon of face lotion into each paint color to make removal easier later. Mix the lotion and paint together with a brush or swab.
    3. Cut a small design, shape, or other stencil from the paper. A bold design without a lot of detail works the best like a star, flower, or cat.
    4. If working alone, look in the mirror for the next steps. Or friends can paint friends.
    5. Hold the stencil on the forehead or cheek. Use a little tape to hold, if desired.
    6. Press the damp makeup sponge into a selected color of paint. Dab it on the edge of the pan to remove extra paint, or on a scrap of paper. Now gently dab the paint on the stencil, covering the skin that shows through the stencil. Let dry a moment.
    7. Remove the stencil and the painted design will remain. The stencil can be used again, but is most effective the first time.
    8. Do as many stencil designs as desired. Explore the use of the brushes and swabs for outlining or mixing colors on the skin.
    9. When dry, remove with soap and water in the shower, or gently remove with face lotion on paper towels or tissues.

    Variations

    Paint designs without stencils on the face.
    Paint the face to look like favorite animals, characters, or themes.

    Cloth Dipping\Creaciones trapo

    by MaryAnn F. Kohl

    From Mudworks, Bilingual Edition, by MaryAnn Kohl, published by Bright Ring Publishing

    Spanish first

    Creaciones trapo
    Provoca desorden y diversión

    MATERIALES

    1 1/2 partes de yeso de París
    1 cucharada de alumbre por cada taza de agua
    1 parte de agua
    trapo, gasa, toallas de papel o sábanas viejas

    PROCESO

    1. Mezcle el yeso de París con el alumbre
    2. Añada al agua el yeso y el alumbre
    3. Revuelva hasta que esté suave y cremoso
    4. Sumerja el trapo en el yeso
    5. Drapee sobre una botella o armazón de cualquier tipo Sugerencia para la armazón: cono de cartón, alambre, cartón de leche, tubos de papel
    6. Drapee y dé forma en 15 ó 20 minutos, antes de que seque

    DATOS
    Al secar queda muy duro

    VARIACIONES

    Úselo para hacer fantasmas o ángeles
    Úselo para hacer formas extrañas e interesantes
    Se puede pintar, dar brillo o pegarle pedrería cuando esté seco

    English version of same project

    CLOTH DIPPING
    Messy and fun

    Materials

    1 1/2 parts plaster of Paris
    1 T. alum for each cup of water
    1 part water
    cloth, gauze, paper towels, or old sheet

    Process

    1. mix plaster of Paris and alum
    2. add plaster and alum to water
    3. stir until smooth and creamy
    4. dip cloth into plaster
    5. drape over a bottle or armature of any kind hint for armature: cardboard cone, wire, milk carton, paper tubes
    6. drape and shape in 15 to 20 minutes before it dries

    Hint: Dries very hard

    Variations

    use to make ghosts or angels
    use to make strange and interesting shapes - can be painted, glittered, or glued with broken jewelry when dry

    MaryAnn F. Kohl
    Bright Ring Publishing, Inc.
    PO Box 31338
    Bellingham, WA 98228-3338

    360.398.9801
    fax 360-383-0001

    maryann@brightring.com
    http://www.brightring.com


    Check out the latest buzz in the Project Center...
     
    #